VMWare Vcenter Appliance Install Stuck Stage 2

When deploying VMWare VCSA in a lab environment the installer often gets stuck at stage 2 starting services. In my case, starting authentication network 2%. This seems to be an issue with VCSA wanting to verify the SSO domain through DNS resolution.

The solution for me was to create an entry in the hosts file of the VCSA appliance through SSH to the CLI. Before doing so, it is best to start from scratch. Delete the partially deployed VCSA appliance. Deploy VCSA through Stage 1 but do not enter Stage 2. Read More

Deploy Office 2019 via GPO

With the advent of Office 2019, Microsoft has moved away from GPO deployment via MSI. There is no MSI of Office, Visio, Project, etc available to download anymore. Microsoft is moving toward using SCCM or the Office Deployment tool. I was tasked with coming up with a method for deploying Office via GPO in a fully automated manner.

There may be more than one way to accomplish GPO deployment of Office, and I do not claim to have the best method. It took me quite a bit of research and troubleshooting to get this method to work. I hope it helps someone looking to accomplish the same thing I was. Read More

Back from the Dead – Virtualizing DOA Laptops

Simple post on restoring dead laptops using virtualization.  Some people ask me: “Is there any way to bring a laptop back from the dead?” or “I dropped my laptop in the toilet and now it wont start! How do I get to my important stuff?”.   The answer is not exactly simple, but it is effective in most cases.  If you need access to the OS for some reason prior to restoring data on a new system, it may be possible to restore the laptop and boot it as a VM.

First off, you need to remove the physical hard drive from the device.  You will want the primary (boot) disk.  You may also need the secondary hard drives if you installed critical apps in non-standard locations.

Second, you need a hard-drive caddy of some sort. Something like this: http://www.newegg.com/Product/Product.aspx?Item=N82E16817270043 would work just fine.  Any enclosure will due.

Third, you need a working computer to plug the enclosure in to.  This will mount the OS drive as an external drive on the chosen machine.  We need to convert this drive to a format virtualization programs will understand.  The most common of which is Virtual Hard Disk (VHD/VHDX) format.  To do this, we need a program like Disk2vhd http://technet.microsoft.com/en-us/sysinternals/ee656415.aspx

Run Disk2vhd, check the appropriate partitions from the connected external drive.  Choose a location with enough space and name your VHD.  Un-check VHDX if you intend to use VirtualBox as the VM player.

Once the VHD is created, install a VM player.  I will be using VirtualBox in this example.

Run VirtualBox and create new VM.  Choose the OS settings from the drop downs.  This must match the version of the OS that was running on the old machine.  If you don’t know the exact version, one way to check is to inspect the ntoskrnl file under /Windows/System32/, look at details and find the product version number.  Reference the version number here: http://msdn.microsoft.com/en-us/library/windows/desktop/ms724832%28v=vs.85%29.aspx and here: http://www.gaijin.at/en/lstwinver.php

Select your memory amount and boot the VM.  The old OS should boot fine and install all new drivers needed.  You may need to perform some system repair, or OS repair due to driver conflicts but most of the time the boot is clean.


Cisco 7960G 3.x Firmware Upgrade Issues

Working on a project to bring a batch of Cisco 7960G phones online with a newer 7.1 CUCM server.  The issue is that the phones were donated, and although new in the box they were using just about every firmware version from 3.x to 8.x, SCCP and SIP.  The newer revisions were simple enough to manually upgrade via TFTP, but the 3.x revisions absolutely would not upgrade. We tried upgrading from 3.x to 5.x, 7.x, etc with no luck.  We would have liked to upgrade them from 3.1 to a newer 3.x revision, but all of those files from Cisco are packaged in an exe intended for CME.  This limited our options.  Finally found an obscure way to get around the UAL conflicts.

Workaround upgrade from 3.x to 7.x SIP then back to SCCP.

You will need the following things:

  • A switch isolated from the production network
  • A TFTP server (TFTPD32)
  • A DHCP server (either the switch or using TFTPD32)
  • Cisco P0S3-07-4-00 SIP zip from Cisco support or here: http://radiotwenterand.nl/~graver/cisco/SIP-7960/
  • Cisco 8.1(1) SCCP zip from Cisco support
  • Cisco 8.1(2) SCCP zip from Cisco support

Set up the switch and plug the PC that you have a TFTP server installed on to the same switch.  Unzip the different revisions to individual folders under the root TFTP directory.  We will be switching back and forth a lot.  Configure the DHCP server with the scope of our choice, and specify option 150.  Point option 150 to the IP address of your TFTP server.  My switch DHCP pool looked something like this:

ip dhcp pool PHONELAB

network 10.1.1.0 255.255.255.0

default-router 10.1.1.1 Read More

Exchange 2013 ECP – :-( Something Went Wrong

Fresh deployment of Exchange 2013.  As you try to connect to the management console https://localhost/ecp/ with a valid administrator account, it redirects to OWA and responds with “:-( Something Went Wrong, A problem occurred when trying to use your mailbox.”

This seems to be related to left over Exchange attributes in Active Directory.  I tried everything from a multitude of TechNet articles including the following:

  1. Rebuilding the ECP front end and back end (Reference)
  2. Adding appropriate permissions to the administrator account
  3. Connecting directly to the back end by using port 444
  4. Messing with certificates (Reference)
  5. Many articles mentioned having CAS and MBX roles installed, but these were installed on the same machine at the same time
  6. Manually creating the administrator mailbox using the exchange shell

Finally I tried just creating another user account in AD and gave it permissions to manage Exchange by adding it to the group ADUC–>Domain.local–>Microsoft Exchange Security Groups–>Organization Management.

That allowed access to the ECP and after some more digging in ADSIedit, I can see old exchange attributes attached to the enterprise Administrator account.  I believe this is the problem as the management console lists Administrator as already having a “legacy” mailbox.  The attributes are referencing exchange servers that no longer exist in the environment.

I plan to start ripping out old exchange attributes to test this theory.

Exchange 2013 Schema Prep – ADC Found

Installing a new Exchange 2013 deployment on an existing domain with questionable history.  The existing domain had untold number of previous Exchange deployments with remnants scattered throughout Active Directory.  After using ADSI edit to manually remove all instances of the old Exchange servers, running a schema prep runs in to an error about an existing Active Directory Connector.  Microsoft suggests (TechNet) disabling the ADC service on the running computer, then uninstalling the service using the exchange server installation CD.  In this situation of course the detected ADC was probably on a computer that was long ago trashed or removed.

Lots of websites describe the method for removing ADCs from AD using ADSIedit.

(Reference)

(Reference)

Open ADSIedit
Expand Configuration –> Services –> Microsoft Exchange –> Active Directory Connections
Delete ADC under Active Directory Connections
Replicate changes to all Domain Controllers

Running the Schema prep another time results in the same error:

After some digging we found the rogue connector buried in Active Directory Sites and Services.

Open the sites and services mmc and look for any machines that aren’t active servers.  Delete anything that doesn’t belong and run the tool again.  It should finish successfully.

Polycom RMX 2000 and Lync 2010

Continuing from my previous post on integrating an existing Polycom system with Microsoft Lync 2010, I will run down the process for integrating a Polycom RMX bridge.  The process is much more difficult than integrating the Polycom endpoints as it requires creating a trusted application within the Lync server, running some shell commands, generating certificates and RMX configuration changes.  Once the integration is complete you can create SIP enabled meeting rooms accessible by Lync users and Polycom endpoints alike.

1. DNS – Making sure the Lync server can contact the RMX by name

Head over to the RMX admin console, under rarely used, find IP Network services.  Go to the properties of the management network, and click the DNS tab.  Fill in the name, domain, and DNS server fields.

When the setting is changed, the RMX will need to reboot.  Unfortunately you will be rebooting the RMX a LOT throughout this process.

Next we head over to your DNS server and create a static DNS record in the primary domain lookup zone, and the primary SIP domain lookup zone (these may be the same depending on your Lync deployment).  Create an A record using the name you chose in the previous step, that points to the signaling IP of the RMX (not the management IP).

I will have created a record for domain.local and domain.org (SIP domain).  You will want to test your DNS settings using nslookup and by pinging the FQDN of the RMX from the Lync 2010 server.

2. Creating a trusted application pool on the Lync server

Head over to the Lync 2010 server and fire up the topology builder.  We want to create a trusted application pool for the RMX.  Polycom and Microsoft reccomend using a pool as best practice to allow for future expansion.  If you add another RMX in the future, users can simply dial the pool name.  Expand the trusted application pool tree, and chose new application pool.

Chose a pool name  (this does not have to resolve in DNS, and is for organization and dialing purposes within Lync only).  Make sure to select multiple computer pool even if you only have on device at this time.

Next you need to define the computers in the pool, in this case you want to use the FQDN of your RMX bridge.

Publish the topology once you are done configuring the pool.  Note that you will get an error about the RMX not being a domain member.  You can ignore this.  Open up the Lync 2010 console and check your topology tab.  Make sure the new computer and pool is listed.  You will see a red X on replication (this is normal).

Now we need to run some shell commands to make RMX a trusted host.

$route=New-CsStaticRoute -TLSRoute -Destination “th-rmx.domain.local” -port 5061 -matchuri “polycom.domain.org” -UseDefaultCertificate $true

Destination = The RMX computer

MatchURI = The pool name

Now we need to SET the route we just added:
Set-CsStaticRoutingConfiguration -Identity global -Route @{Add=$route}

Next we need to create the trusted application:

New-CsTrustedApplication -ApplicationId polycom -TrustedApplicationPoolFqdn polycom.domain.org -port 5061

ApplicationID = Any simple name, this does not matter

TrustedApplicationPoolFQDN = The pool name we created in the Lync topology

Finally, we need to update the topology:

Enable-CsTopology

Double check your Lync 2010 console under topology and the trusted application tab.

3. Certificates – Self Signed

Head over to the IIS manager on the Lync 2010 server.  On the root server, click certificates.

Once in the certificate manager select create domain certificate.

Fill out all the required details, and make sure the common name is the FQDN of the RMX.

On the next screen you will pick your internal CA, and chose a friendly name (this can be anything).  When the wizard is complete you should see your certificate in the list.  Close the IIS manager.

Go to start –> Run.  Type “mmc” and hit enter.

Chose File –> Add/Remove Snap-in

Select certificates from the list and click “Add->”.  When prompted, select “computer account”.

On the next screen select Local Computer.

Expand the tree, click Personal –> Certificates.  Find the certificate you created earlier, right click and  select All Tasks –> Export.

Click Next, when prompted, chose to export the private key.

On the next screen, be sure to check include all certificates in the path.

You will be prompted to enter a password.  Chose a strong password and continue.  Export the certificate.  In the directory where you exported the certificate, create a text file, name it certPassword.txt, type the password you created earlier in this text file and save it.

4. Setting up the RMX and importing the certificate

Open up the RMX manager again.  Click IP Network Services, right click IP Network Service and chose properties.  Make sure IP network type is set to H.323 & SIP.

Click on the SIP Server tab. Select Specify server, then chose Microsoft.  Fill in the server details. Server IP address or name should the FQDN of your Lync 2010 front end server.  Port should be 5061.  IMPORTANT: The Domain field should be your PRIMARY SIP domain name.  Chose PEM/PFX from the certificate drop down menu.  Click Send Certificate.

After clicking Send Certificate, click Browse, and select BOTH the certificate file and the password file we created earlier.  Finish the wizard to complete the certificate import.

You can check the status of your configuration once the RMX reboots by clicking on Signaling Monitor, then properties, SIP Server.  You should see status “OK”

5. Testing configuration

You can test your new application pool by dialing one of your existing meeting rooms from Lync.  As an example we will dial 1001@polycom.domain.org.

You should dial in to the RMX meeting room and be prompted according to how you have the room configured in the RMX.

I ran in to some difficulty here because Lync wants to force encryption.  Originally my calls to the meeting rooms were failing due to crypto negotiation.  If you aren’t using encryption in your existing meeting rooms, you will need to create a new one that allows encryption.  The error messages Lync gives is not descriptive, so this took me a bit to figure out.  I was forced to review the SIP stack logs on the Lync server to find the problem.

6. Making it easier to use

We don’t want users being forced to type “meetingID@poolFQDN” to get access to the meeting rooms all the time.  There are several ways to make the rooms show up as users in the Lync clients AND in the Global Directory on the Polycom Endpoints.

The first is to create an AD contact object, edit the attribute field msRTCSIP-PrimaryUserAddress with “sip:meetingID@poolFQDN”.  This contact will trickle down to Lync and users will be able to call the room.  This method will work, but it isn’t a complete solution in my opinion.

7. Creating SIP enabled meeting rooms

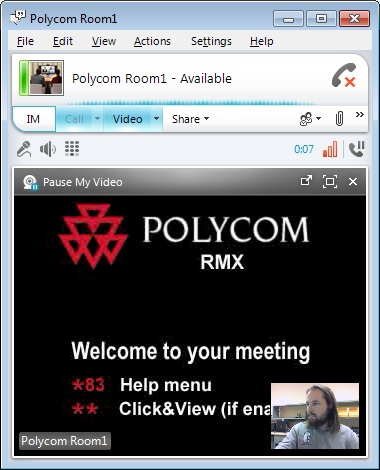
Instead lets create a couple of SIP Polycom meeting rooms.  First off, head over to AD and create a new user.  Call it Polycom Room1, with a login name of polycomroom1@domain.local.  We also add this account to an active directory group along with the HDX accounts for pushing to users contact lists in the future.

The login name will be important when we head back to the RMX configuration.

Head over to the Lync 2010 shell, and enable this new user in Lync.

-EnableCsUser -Identity “Polycom Room1” -RegistrarPool lync01.domain.local -SipAddressType SamAccountName -SipDomain domain.org

Again, we usually include an AD photo attribute that makes the meeting room stand out from normal users:

Head back over to the RMX, click on meeting rooms, then select New Meeting Room.  Give the room a name, and pay attention to the “Routing Name” field.  This corresponds directly with the LOGIN name we gave the Lync enabled AD user earlier.  Make sure it matches exactly.  Pick any ID as long as it is unique.

Once the meeting room is created, click on Hardware Monitor, then click the yellow reset button to bounce the RMX.

Once the RMX comes back up, the meeting room should register with the Lync 2010 server.  To check it head over to meeting rooms, and you should see SIP “Registered”.

You should be able to head over to the Lync 2010 client and find the room:

Likewise, you can head over to an HDX endpoint, browse the Global Directory and find the newly registered SIP meeting rooms.  This rounds out the Polycom and Lync integration very well, making it easy for users to take advantage of the media rich environment Polycom provides.

Polycom HDX 7/8000 and Lync 2010

Recently I have been working on integrating an existing Polycom video conferencing system with a new Lync 2010 deployment.  As it turns out the newer software releases for Polycom have made great progress towards making the integration of Polycom systems with Lync easier.  I say easier, because it still isn’t exactly easy.  There are many cool features of integrating Polycom and Lync.  By using a Polycom RMX, one can have continuous presence using the meeting room format.  This is something that was sadly left out of Lync 2010.  As most people who have used Lync 2010 will tell you, it doesn’t do a very good job of switching between active speakers.

Integrating Polycom HDX 7000 and 8000 endpoints is VERY straight forward.  The only problem is if you don’t have multipoint licenses you can only have a one-to-one call with a Polycom endpoint.  Hence the reason for an RMX.

Requirements for integrating an HDX 7000/800 with Lync 2010:

First off you will need a valid user account in Active Directory for each HDX endpoint.  As an example, we are creating a user called “Polycom LA”, for our Los Angeles HDX 7000.  We will use polycomla@domain.local as the logon name.  Make sure password never expires and user cannot change password fields are checked. When this user is created, it will automatically be assigned a logon name in our valid SIP domain of @domain.org.

For further organization we use Active Directory groups to organize Lync users.  Later, we push these groups to the contact lists of Lync users with powershell.  For this example we are creating a universal security group called “wgrp-polycom”.

Now we need to activate this new AD user on our Lync front end server.  Using the Lync server management shell: PS C:\>Enable-CsUser -Identity “Polycom LA” -RegistrarPool lync01.domain.local -SipAddressType SamAccountName -Sipdomain domain.org.

Just for the heck of it, and to allow easy visual identification of the Lync user as an actual Polycom system and not a human being, we add an AD image of a Polycom camera.  This corporate image will trickle down to Lync and make it look really slick.  You can use any free AD image attribute editor for this.

Finally, we need to configure the HDX with a SIP connection to the Lync 2010 server.  The thing to note here is the difference between User Name and Domain User Name.  The User Name field should contain the username for the primary SIP domain “polycomla@domain.org”, and the Domain User Name should be the AD logon account polycomla@domain.local.

Now we can test the Polycom configuration by heading to the global directory and searching for a user.  If the integration with Lync 2010 is working correctly you should be able to find any active Lync users and call them directly.  You should also be able to find other polycom units if they were Lync enabled.  Pretty cool huh?

You can check the status of the registration with Lync on the unit itself or through the web interface, and the registrar server should have a green up arrow.

In my next post I will be going over the integration of an RMX 2000, including the issues I ran in to with the RMX being unable to contact the Lync SIP server.

Cisco StackPower – Port Issues

I have recently been battling with Cisco Stackpower issues and commands that have been difficult to find. In one environment the company uses 3750X series switches exclusivly in large stacks to avoid a spending cap on single items. Instead of buying blade switches we stack 24 port gig PoE 3750X switches. As an added benefit, with Stackpower we can make the switches redundant without buying additional power supplies. They will also distribute power if PoE devices are unevenly distributed to one switch or the other. Unfortunately when configuring Stackpower, not all ports are active at first, and sometimes the power sharing mode may be configured as something other than “sharing” by default.

A good overview for Cisco’s Stackpower can be found here: Cisco Stackpower Whitepaper

First off we have a stack of eight 3750X switches. Obviously Stackpower in a redundant ring topology limits you to four switches on each power stack. You will want to issue a few show commands to see what is going on with Stackpower and the power supplies:

switch#show env power all

This show command should give you an overview of the installed power supplies and switch numbers.

switch#show stack-power

sj-sw2-01#sh stack-power
Power stack name: Powerstack-1
Stack mode: Power sharing
Switch 1:
Power budget: 719
Low port priority value: 19
High port priority value: 10
Switch priority value: 1
Port 1 status: Shut
Port 2 status: Not Connected
Neighbor on port 1: 0000.0000.0000
Neighbor on port 2: 0000.0000.0000

Two things to note here.  A “shut” status means that the stackpower port is administratively down, while “not connected” means there is a physical problem with the Stackpower cables.

This is where things get tricky.  Documentation will tell you to enable the ports using the following command in exec mode:

switch#stack-power switch 1 port 1 enable

Seems like that would make sense, except when checking again:

switch#show stack-power

Power stack name: Powerstack-1
Stack mode: Power sharing
Switch 1:
Power budget: 719
Low port priority value: 19
High port priority value: 10
Switch priority value: 1
Port 1 status: Shut
Port 2 status: Connected
Neighbor on port 1: 0000.0000.0000
Neighbor on port 2: e05f.b90a.9c80

The cure for this behavior is to issue a disable then an enable.

switch#stack-power switch 1 port 1 disable

switch#stack-power switch 1 port 1 enable

switch#show stack-power

Power stack name: Powerstack-1
Stack mode: Power sharing
Switch 1:
Power budget: 719
Low port priority value: 19
High port priority value: 10
Switch priority value: 1
Port 1 status: Connected
Port 2 status: Connected
Neighbor on port 1: c471.fe62.2680
Neighbor on port 2: e05f.b90a.9c80

Once you have all of the stack-power ports enabled, the next step is to place them in stack power groups (if they didn’t automatically assign).  Remember that when changing group membership, the entire stack must be reloaded.

switch(config)#stack-power stack Powerstack-1
switch(config-stackpower)#exit
switch(config)#stack-power switch 1
switch(config-switch-stackpower)#stack Powerstack-1

Repeat the command for each switch in the stack.  You can change the power sharing mode, and add priorities based on the needs of your environment.

%d bloggers like this: