Working on a project to bring a batch of Cisco 7960G phones online with a newer 7.1 CUCM server. The issue is that the phones were donated, and although new in the box they were using just about every firmware version from 3.x to 8.x, SCCP and SIP. The newer revisions were simple enough to manually upgrade via TFTP, but the 3.x revisions absolutely would not upgrade. We tried upgrading from 3.x to 5.x, 7.x, etc with no luck. We would have liked to upgrade them from 3.1 to a newer 3.x revision, but all of those files from Cisco are packaged in an exe intended for CME. This limited our options. Finally found an obscure way to get around the UAL conflicts.

Workaround upgrade from 3.x to 7.x SIP then back to SCCP.
You will need the following things:
- A switch isolated from the production network
- A TFTP server (TFTPD32)
- A DHCP server (either the switch or using TFTPD32)
- Cisco P0S3-07-4-00 SIP zip from Cisco support or here: http://radiotwenterand.nl/~graver/cisco/SIP-7960/
- Cisco 8.1(1) SCCP zip from Cisco support
- Cisco 8.1(2) SCCP zip from Cisco support
Set up the switch and plug the PC that you have a TFTP server installed on to the same switch. Unzip the different revisions to individual folders under the root TFTP directory. We will be switching back and forth a lot. Configure the DHCP server with the scope of our choice, and specify option 150. Point option 150 to the IP address of your TFTP server. My switch DHCP pool looked something like this:
ip dhcp pool PHONELAB
network 10.1.1.0 255.255.255.0
default-router 10.1.1.1
option 150 ip 10.1.1.10
ip dhcp exluded-address 10.1.1.10
interface vlan 1
no ip address
interface vlan 2
description PHONE LAB
ip address 10.1.1.1 255.255.255.0
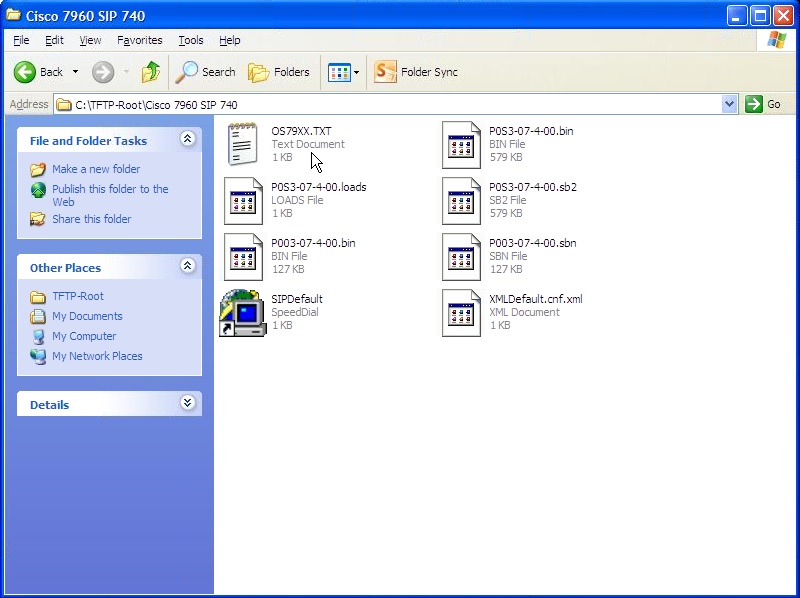
Where 10.1.1.10 is the address I gave the laptop used as the TFTP server. The first directory we want to work with is the SIP 7.4 directory.

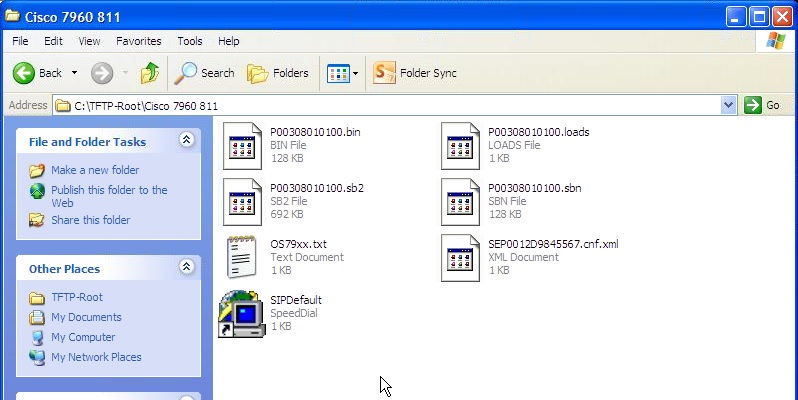
You will be working with the following files:
- OS79XX.TXT
- P003-07-4-00.bin (UAL binary)
- P003-07-4-00.sbn (UAL signed binary)
- P0S3-07-4-00.bin (UAL SIP binary)
- P0S3-07-4-00.loads (Loader config for UAL)
- P0S3-07-4-00.sbn (SIP image file #1)
- P0S3-07-4-00.sb2 (SIP Image file #2)
- SIPDefault.cnf
- XMLDefault.cnf.xml
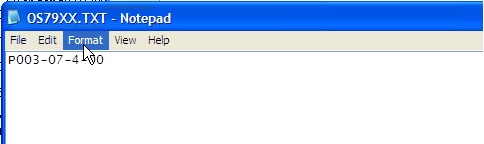
OS79XX.TXT – All Cisco phones with older firmware grab this txt file first. It should contain just the name (no extension) of the UAL. In this case that would be “P003-07-4-00“.
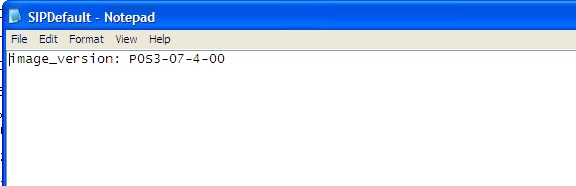
SIPDefault.cnf – This only needs to contain one line of information. “image_version: P0S3-07-4-00”
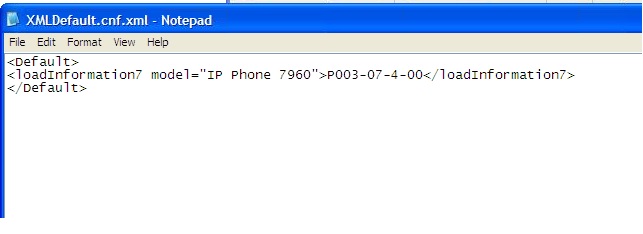
XMLDefault.cnf.xml – This also only needs one line of information pointing to the correct UAL image.
<Default>
<loadInformation7 model=”IP Phone 7960″>P003-07-4-00</loadInformation7>
</Default>
This is where is gets really tricky! Follow this procedure exactly:
- Make sure the XMLDefault.cnf.xml file is pointing to the UAL P003-07-4-00 as above
- Boot phone
- Watch log on TFTP server for phone to grab the UAL
- Watch phone – As soon as phone begins to reboot change XMLDefault.cnf.xml to P0S3-07-4-00 and save the file.
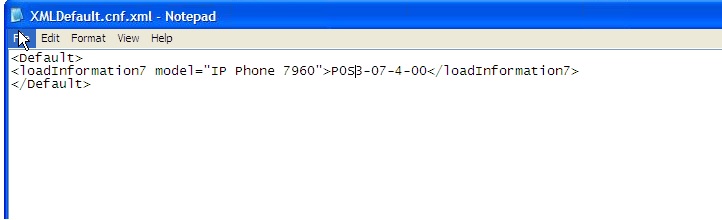
- Wait for phone to boot and it will load the SIP image
- Phone should report “unprovisioned”
- Unplug phone
After the phone successfully updates, we now need to load the next SCCP image. (I decided to upgrade sequentially from 7.4 to 8.11 then 8.22) You should have the following files in a folder under the TFTP root”
- P00308010100.bin
- P00308010100.loads
- P00308010100.sb2
- P00308010100.sbn
- SEP(MAC Address).cnf.xml
- SIPDefault.cnf
- OS79XX.TXT
OS79XX.TXT – should have only “P00308010100”
SEP(MAC Address).cnf.xml – should contain only one line “<loadInformation model=”IP Phone 7960″>P00308010100”
SIPDefault.cnf – should contain only “image_version: P00308010100”
- Change the TFTP folder to the 8.11 SCCP image folder with the above files.
- Boot the phone
- Phone will pull the sbn, then reboot and pull the sb2 file.
- Phone will then be in a reboot loop looking for addition configuration
Now we can move on to the latest version of SCCP 8.1(2). The process is much the same as the last except we need fewer files. You should have in a directory under the TFTP root:
- P00308010200.bin
- P00308010200.loads
- P00308010200.sb2
- P00308010200.sbn
- SEP(MAC Address).cnf.xml
SEP(MAC Address).cnf.xml – should contain only one line “<loadInformation model=”IP Phone 7960″>P00308010200”
- Change the TFTP folder to the 8.12 SCCP image folder with the above files.
- Boot the phone
- Phone will pull the sbn, then reboot and pull the sb2 file.
- Phone will then be in a reboot loop looking for addition configuration
That’s it! The phone should be up to the latest skinny version.
Qualifications